
Welcome to your Synaccess netBooter DU Series PDU! This guide will help you connect to your PDU over ethernet.
Default Networking Settings
Before connecting, here are the factory-default network settings:
- Static IP Address: 192.168.1.100
- Subnet Mask: 255.255.0.0
- Gateway: 192.168.1.1
Default Login Credentials
- Username: admin
- Password: admin
Resetting Back to Factory Defaults
Press and hold the RST button for 3-5 seconds; the PDU needs to already be powered on when pressing the RST button.
Note that holding the RST button for too long (e.g. 10+ seconds) will simply restart the PDU instead of performing a factory reset
Option 1: Connect via Ethernet (Connected to a Network)
Use this method if you're connecting your netBooter DU Series PDU to a router or switch on your local area network (LAN).
Step 1: Connect the PDU to Your Network
- Plug the PDU into your network switch or router using a standard Ethernet cable.
- Observe the Link LED (located on the front panel):
- ✅ Good Connection: The LED is solid with occasional fast blinking — this indicates a healthy link with network traffic.
Step 2: Attempt to Access the Web Interface
If your network supports the PDU’s default configuration, you may be able to connect immediately:
- Factory Default IP Address: 192.168.1.100
- On a PC connected to the same network, open a web browser and navigate to http://192.168.1.100
⚠️ The netBooter DU Series by default is configured with HTTPS off - when you first access the web UI, some modern browsers may reject or block the connection by default.If you receive a warning such as “Connection not secure” or “Your connection is not private,” look for an “Advanced” or “Proceed anyway” option to continue. You can later configure the PDU to turn on HTTPS.
Step 3: If You Can’t Connect
If you're unable to access the PDU at 192.168.1.100, it’s likely because your network uses a different IP range (subnet) than the PDU’s default static IP.
Here are your options to proceed:
- Direct-to-PC Ethernet Setup: Connect the PDU directly to your computer via Ethernet and assign a compatible static IP to your PC (see the next section).
- Use Serial Console: Connect to the PDU's serial port and access the configuration menu to manually update networking settings.
- Switch to DHCP Mode: If your network uses DHCP, you can force the PDU to request an IP automatically:
- Power off the unit.
- Insert a paperclip into the "RST" reset hole on the front of the PDU.
- While holding the pin, power on the PDU and continue holding for several seconds.
- The PDU will attempt to obtain an IP address from your network’s DHCP server.
💡 Tip: The default hostname for DHCP mode is REMOTEPDU. You can also locate the PDU using the MAC address printed on the product label (on top of the unit) by checking your router or DHCP server’s device list.
Option 2: Connect via Ethernet (Direct to PC)
Use this method if you want to directly connect the PDU to your PC via Ethernet (without a router or switch). A standard CAT5 ethernet cable can be utilized (crossover cables are not required).
Step 1: Manually Configure Your PC’s IP (Windows)
- Open Network & Internet Settings on your PC
- Find the Ethernet adapter connected to the PDU.
- Click Edit under IP assignment.
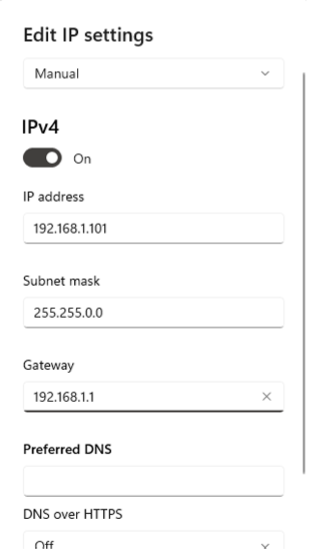
- Set the configuration to Manual (IPv4) and use:
- IP Address: 192.168.1.101
- Subnet Mask: 255.255.0.0
- Gateway: 192.168.1.1

Step 2: Connect to the PDU
- Open a web browser or Telnet client.
- Navigate to: http://192.168.1.100
- Configure the network settings as you see fit to work with your network
- After configuring the network settings, set the network settings back to orignial (likely Automatic for IP Settings)