
This basic guide will walk you through how to connect to your netBooter PDU using the serial console interface. Serial access is useful for initial setup or when network access isn’t available.
netBooter PDUs come equipped with either:
- A DB9 RS-232 serial port, or
- A USB serial interface
Step 1: Identify the COM Port
For USB Serial Devices:
- Plug the USB cable into your PDU and computer.
- Open Device Manager (Press Windows Key and search for "Device Manager")
- Expand the Ports (COM & LPT) section.
- Look for an entry named “USB Serial Port (COMx)” — the number x indicates your assigned COM port
💡 netBooter units with USB ports manufactured after 2018 use an FTDI-based USB-to-Serial chipset, supported natively by most modern Windows versions — no driver installation is needed. If you do see issues with the driver on your installation, you may download drivers at the following link:
https://ftdichip.com/drivers/vcp-drivers/
For DB9 Devices:
Use the COM port assigned to the serial port you’ve physically connected your PDU to (typically labeled COM1, COM2, etc.).

Step 2: Install & Open PuTTY
We recommend PuTTY for accessing the serial console on WIndows. If you prefer to use a different application, please adjust accordingly.
- Open PuTTY.
- In the left-hand sidebar, go to Connection → Serial.
- Enter the following default serial settings
- Speed:
- For netBooter B and DU series PDUs, the default speed is 9600
- For netBooter DX series PDUs, the default speed is 115200
- Data Bits: 8
- Stop Bits: 1
- Parity: None
- Flow Control: XON/XOFF
- Speed:

Step 3: Open the Serial Session
- In PuTTY, click on the Session category at the top of the sidebar.
- Set Connection Type to Serial.
- In the Serial Line field, enter the COM port you identified earlier (e.g.. COM1, COM2, etc)
- Click Open to start your session.

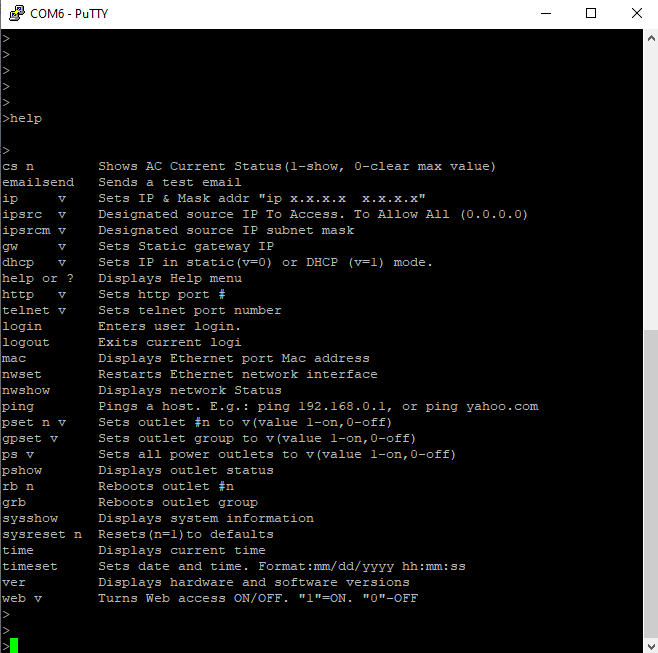
Step 4: Confirm You’re Connected
Once the terminal window opens:
- Type help, press enter, and confirm you get a response back
- You are now connected to the netBooter PDU via serial console.
FAQ
Q: I don't have the right USB driver installed on Windows
A: Most modern Windows installations should automatically recognize and work with netBooter USB serial ports. However, depending on your system configuration and PDU hardware revision, you may need to install the appropriate driver manually.
Identify which serial chipset your PDU uses
- Open Device Manager.
- Right-click the unknown device that corresponds to the netBooter PDU and select Properties.
- Go to the Details tab.
- From the Property dropdown, select Hardware Ids.
- You should see a string similar to one of the following:
USB\VID_04D8&PID_00DD → This is Microchip MCP2221A (driver/page link)
USB\VID_067B&PID_2303 → This is Prolific PL2303 (driver/page link)
USB\VID_0403&PID_6015 → This is an FTDI chipset (driver/page link)